4.1 An overview of FLaVor FV
This page shows PI how to modify the custom code that fits the interface of AI-Lab federated learning framework by the assistance of FLaVor and build it into a docker image. Here we invoke FLaVor FV example code for PyTorch which can be deduced to other frameworks as well. The full examples of the changing from custom code to FLaVor-styled code are presented in the following sections in this chapter.
Prerequisites
Assume our file structure is like
|
CoPI |---dataset | |---img1.jpg | |---img2.jpg | |---labels.csv |---dataset.zip # from the compressing of dataset
PI |---main.py # custom training / validation code |---requirements.txt # the packages that main.py needed and Flavor |---Dockerfile # script for building an image that contains main.py and has packages in requirements.txt installed |
, where the black parts are exists.
Modify main.py
| Before | After |
| load dataset from local load weights from local validating save result at local |
load dataset from os.environ["INPUT_PATH"] # step 2 load model weights from os.environ["WEIGHT_PATH"] # step 2 validating Prepare an output dictionary # step 1 save the output dictionary to os.environ["OUTPUT_PATH"] # step 2 |
We will step-by-step elaborate each modifications in detail. The below image is a part of an example. Note that the modified code cannot be executed locally since FLaVor and other packages should be installed in docker.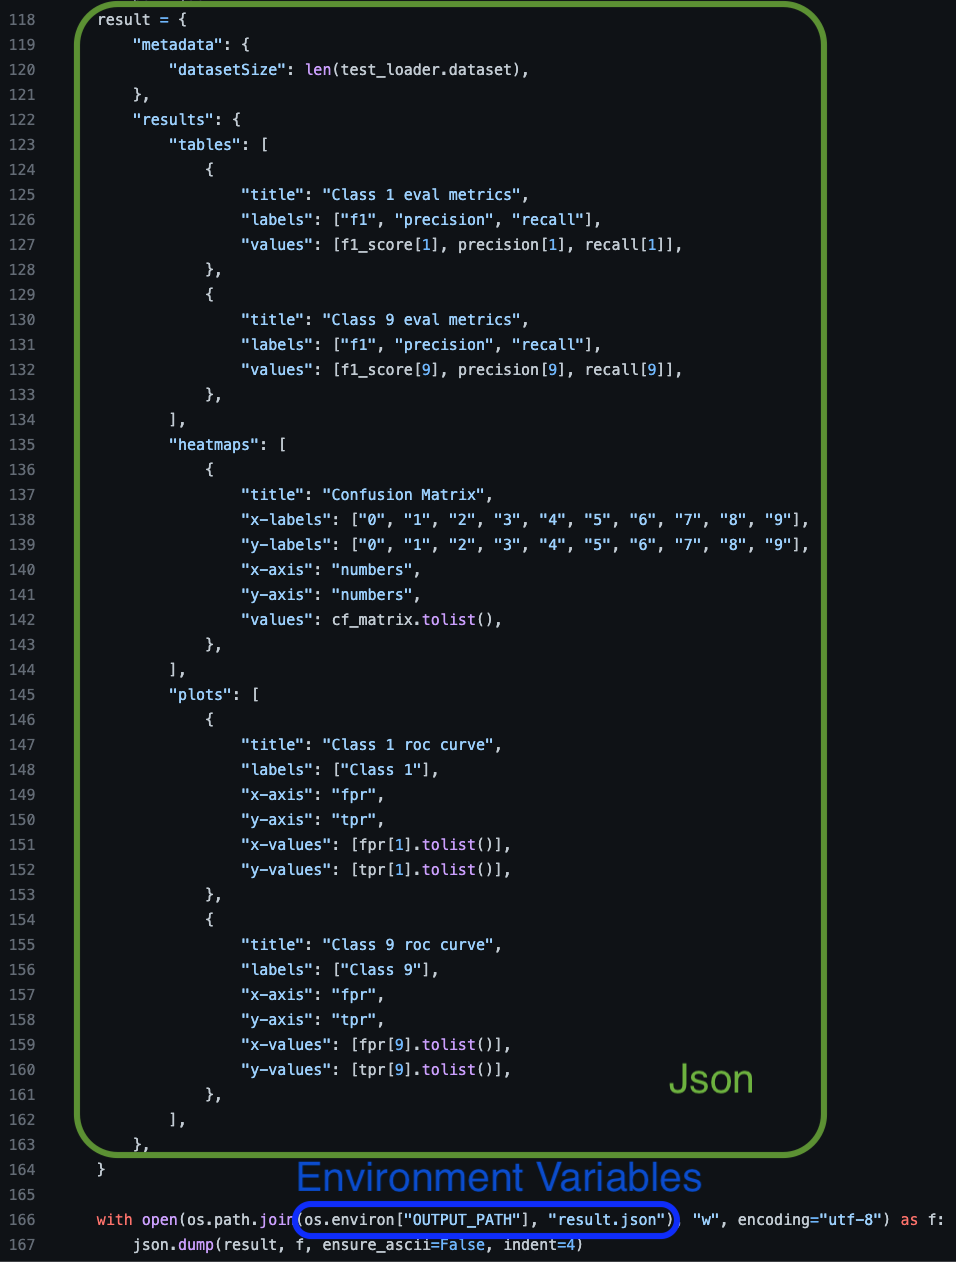
Step 1 - (OUTPUT INTERFACE) Prepare a dictionary
The dictionary should be in the specified format as the Green Box in the above example image. It stores the output results of validation which contains two keys, "metadata" and "results". The detail spec is at following.
- metadata: dict
- dataSize: int # MUST. It is the number of the validation data.
- results: dict
The categories are all OPTIONAL. If len(tables) is 3, you will see 3 tables on the dashboard. Each instance in a category is passed by a dict. e.g. tables["title"] means the title of the table.- tables: list[dict] # It's 1-D table, so input 1-D column name and value.
- title: str
- labels: list[str]
- values: list[num]
- bars: list[dict]
- title: str
- labels: list[str] # e.g. names of M categories
- y-axis: str
- values: list[num] # e.g. values of M categories
- heatmaps: list[dict]
- title: str
- x-axis: str
- y-axis: str
- x-labels: list[str]
- y-labels: list[str]
- values: list[list[num]]
- plots: list[dict]
- title: str
- x-axis: str
- y-axis: str
- x-values: list[list[str]] # e.g. M*N means M categories with each N time series points
- y-values: list[list[str]] # e.g. M*N means M categories with each N time series points
- labels: list[str] # e.g. Must be M categories as above
- images: list[dict]
- title: str
- filename: str # The image name saved in OUTPUT_PATH
- tables: list[dict] # It's 1-D table, so input 1-D column name and value.
Be careful that numpy.float and numpy.int cannot be saved into a json file (NOT json serializable). Please Convert them by int() or float() in advance.
Note that if any of the value is possible to be NAN, please use math.isnan(...) or numpy.isnan(...) to avoid storing NAN to json.
A heatmap which correspond to a confusion matrix where its index (i,j) refers (x,y).
e.g. "x-labels":["x0", "x1", "x2"], "y-labels":["y0", "y1", "y2"], "values":[[v00, v01, v02], [v10, v11, v12], [v20, v21, v22]]. The result shown on dashboard will be:
| x0 | x1 | x2 | |
| y0 | v00 | v01 | v02 |
| y1 | v10 | v11 | v12 |
| y2 | v20 | v21 | v22 |
Step 2 - (INPUT INTERFACE) Set environment variables
For the absolute path in the above table, replace all of them with environment variables as the Blue Box in the above example image.
| Code environment variables | Type | Explanation | Aggregator Dashboard Setting Plans Inputs |
| INPUT_PATH | Directory | Validation dataset | Datasets location |
| WEIGHT_PATH | Full path | Pre-trained weights | AI model weights location |
| OUTPUT_PATH | Directory | Saved results after validation | Output files location |
| (Optional) LOG_PATH | Directory | Additional logs | Log files location |
- The design is for flexibility. It is strongly recommended that the pre-trained weights and the dataset should NOT be packed into the docker, so environment variables are necessary.
- The environment variables will be passed during "offline testing" and "online plan setting", so DON'T set the values at main.py or Dockerfile.
- "Offline testing" means this page "Step 4 - Test whether the docker image runs properly".
- "Online plan setting" means the last column "Aggregator Dashboard Setting Plans Inputs" which is in the page 5.1 Getting started "Step 4 - PI setting up a training plan".
- For errors debugging, write files in LOG_PATH is a recommended method.
[INPUT_PATH]
Here are some examples
| Before | After |
| # import cv2 img = cv2.imread("./dataset/img1.jpg") |
# import cv2 img = cv2.imread(os.environ["INPUT_PATH"]+"/dataset/img1.jpg") |
| # import pandas as pd df = pd.read_csv("./data.csv") |
# import pandas as pd df = pd.read_csv(os.environ["INPUT_PATH"]+"/data.csv") |
[WEIGHT_PATH]
Load pre-trained weights from the path into the model.
[OUTPUT_PATH]
Save the prepared dictionary as $OUTPUT_PATH/result.json. Remember to import json in advance.
(Optional step in most cases) - Add process finished event
If "python main.py" can be run successfully but it raise error after the entire script while running on our platform, please add these line at the end of the script.
| from flavor.cook.utils import SetEvent SetEvent("ProcessFinished") |
Prepare requirements.txt
- If you use Pytorch docker image as the based image, you DON'T need to install Pytorch again. So does the other frameworks.
- Just list the packages in lines. Remember to add FLaVor. They will be installed by pip in a docker container.
|
# package1 |
Prepare Dockerfile, then build it and test it
Step 3 - Prepare Dockerfile
Create a Dockerfile that can generate an image that:
- has FLaVor installed
- has main.py, and can run the checking (check-fv in the next step) successfully.
- has the command that executes the code by flavor (flavor-fv)
Here is an example:
|
FROM pytorch/pytorch:1.12.0-cuda11.3-cudnn8-runtime COPY main.py /app/main.py WORKDIR /app RUN pip install torch torchvision torchaudio --index-url https://download.pytorch.org/whl/cu118 RUN pip install https://github.com/ailabstw/flavor/archive/refs/heads/release/stable.zip -U CMD flavor-fv -m "python main.py" |
Step 4 - Pack the code into a docker image
Generate an image based on the Dockerfile. Here is an example command.
| docker build -t foo:v0 . |
Step 5 - (Optional) Test whether the docker image runs properly
Run a container that mounts the dataset and the pre-trained weights. For instance:
| docker run -id --rm --gpus all --runtime=nvidia --shm-size=64g -v ./CoPI/dataset:/data -v ./weights/:/weights -w /app --name foo_test foo:v0 sleep inf & |
Login the container
| docker exec -it foo_test /bin/bash |
Verify the checking
| check-fv -m "python main.py" |
You will pass the environment variables at this step.

Finally, you can see "Run Successfully !!!" in the console if it's well done. Conversely, if any error occurs, please fix the code bugs then re-pack the code (the two final steps) again until it runs successfully.
If you can complete the steps in this page successfully, you can terminate this chapter and go to 5.1 getting started. Conversely, please refer the full code examples according to your code framework and its modifications in the following sections.